Community JourneyThe Plot Twisters team's unique community-building process.
Plot Twisters
Personal storytelling as play.
Home
Case Studies 

 Poetic JusticeDigital Interface LabJourney Building PreprintRole Model ReportsThink Tank Book Club
PrototypeAboutPlot Twister WorksheetsVisual and verbal exercises for reflecting on life on paper.
The Homework Plot Twister
The Long Foldable Plot Twister
The Quick Foldable Plot Twister
Cookie Trail Calculator
Gift Tagger
Learning Is About YouFictional short stories about the magic of learning.
Enchanted Loom University, Pt. 1
The Gorgeous Motley Bazaar
Bibliography 


All case studies
Plot Twister WorksheetsVisual and verbal exercises for reflecting on life on paper.
The Homework Plot Twister
The Long Foldable Plot Twister
The Quick Foldable Plot Twister
Cookie Trail Calculator
Gift Tagger
Learning Is About YouFictional short stories about the magic of learning.
Enchanted Loom University, Pt. 1
The Gorgeous Motley Bazaar
← Back to all case studies
The Homemade Cookie Diary is a physical do-it-yourself (DIY) personal journaling interface invented by Jenny Liu Zhang in March 2020. This craft project continues to prototype the conceptual metaphors "cookie" and "cookie trails" to refer to "personal events and milestones" and "thematic life narratives" respectively; these metaphors were first introduced in the Plot Twister worksheets.
Jenny piloted craft sessions of the project as Plot Twisters workshops during spring 2020. This case study is written from Jenny's point of view.
Introduction
The Homemade Cookie Diary is a craft project for physically assemblying and starting your own personal journal with materials you have at home. Through two pilot workshops, I iterated on the self-reflection goals of the diary and steps of the crafting process. The diary project was introduced to storytellers and team members alike in the context of facilitated workshops. They also had access to a Notion document with guided visual and verbal instructions.
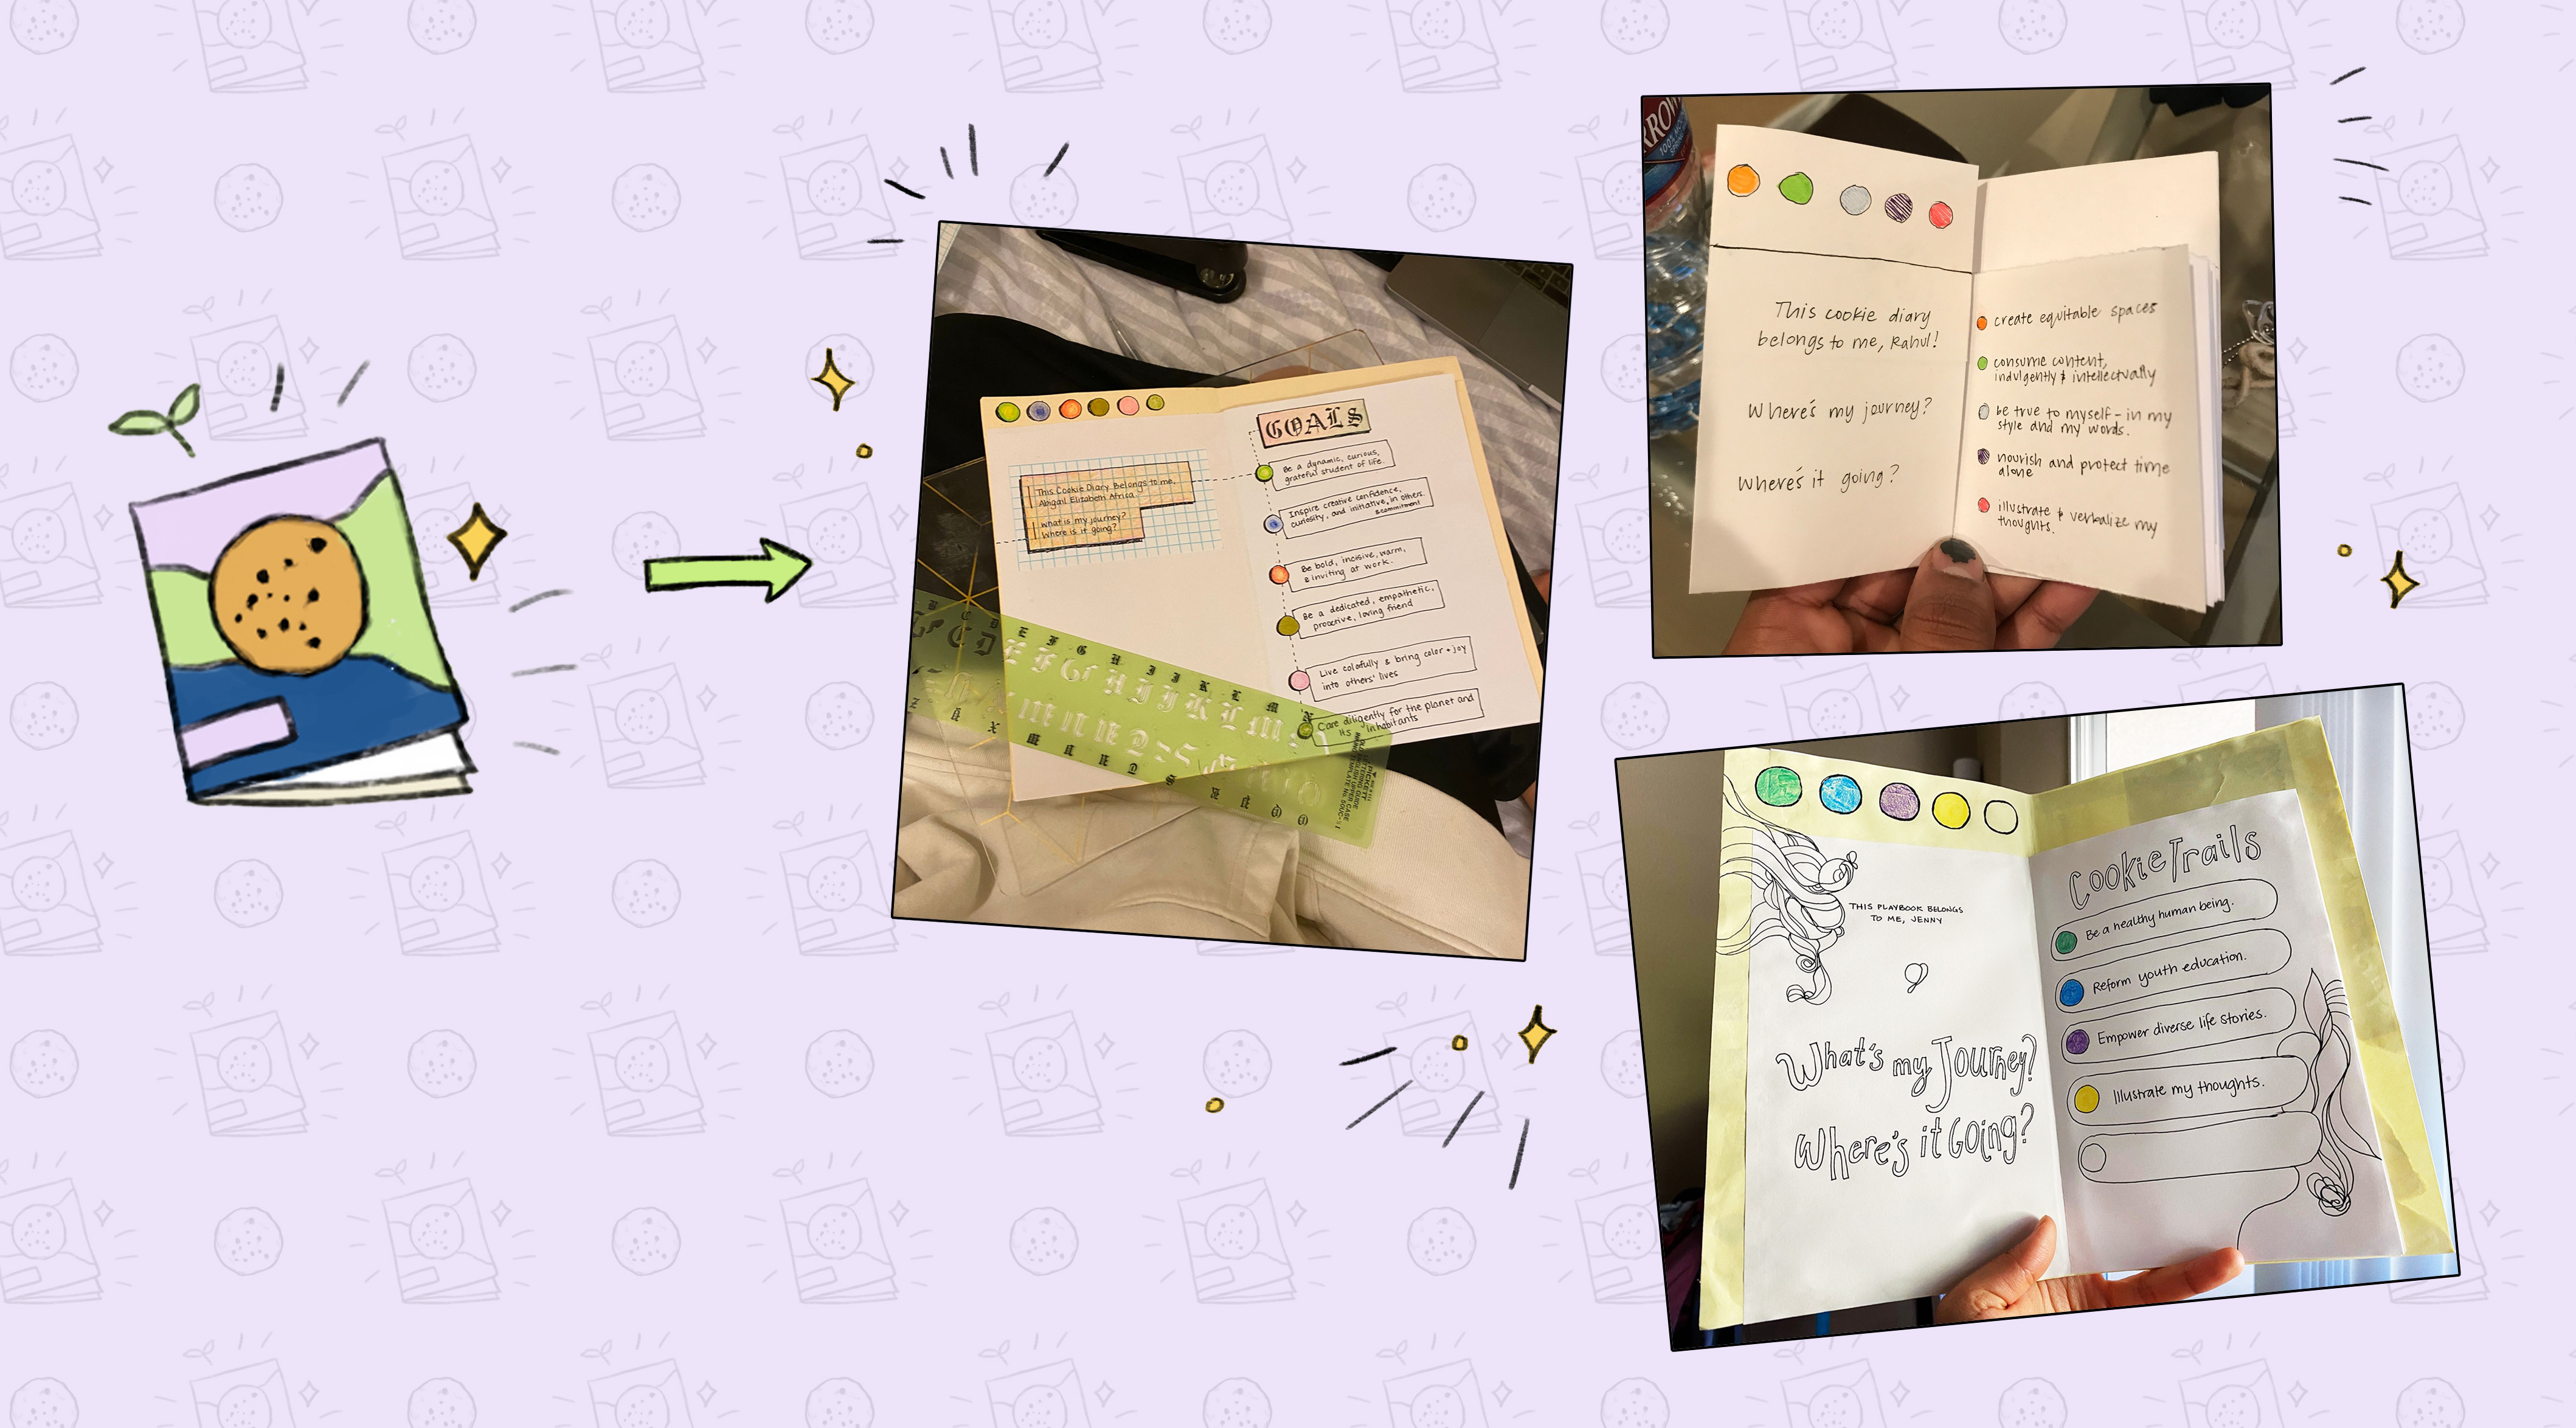 Real examples of Homemade Cookie Diaries created in a Plot Twisters workshop in spring 2020.
I kicked off each workshop with a playful introduction to explain the project and set the tone for the session.
Dear Storyteller,
Nice to meet you! I'm Jenny. Today, we're going to be making your Homemade Cookie Diary.
Your Homemade Cookie Diary is a journey builder that you make for yourself, out of paper and crafts supplies. You use your Homemade Cookie Diary to document your most memorable experiences and reflect on your life goals.
As you go through life, you can always find your Homemade Cookie Diary to check up on your life experiences and goals. What's life like? How's the baking going?
The best part is that you can always add more pages to your Homemade Cookie Diary. That's great news, because there are still many experiences ahead of you on your journey.
Step 1: Pre-heating the oven
To start the process, I installed a placesetting ritual that included some meditative self-reflection. For five minutes, I asked participants to reflect on their lives through several prompts about their past experiences, goals, values, and knowledge.
Before we start making your Homemade Cookie Diary, let's warm up and reflect on a few ideas. Take a few minutes to yourself to go on a nice walk or play your favorite music. As you get comfortable, think about how you would answer the following questions:More optional questions:
- What are the top ten (10) experiences in my life that have shaped who I am today?
- What are my top five (5) consistent life goals?
These can include dreams you've had since you were little, themes that connect all your passions, intentions that you believe in, or routines that make you who you are.
- What are some personal values you believe you embody?
- What are some qualities that others have praised in you?
- What roles do you find yourself playing for other people, or in your work?
- What areas of knowledge/skills are you an expert on?
- What makes work enjoyable for you?
- Which qualities about your work environment are important to you?
- What feelings, obstacles, or circumstances do you struggle with sometimes?
- What are some life lessons you've picked up and held close to you?
Feel free to write down your thoughts, or talk them through with someone you're close to.
Once you have your responses, choose a method below to start making your Homemade Cookie Diary!
Step 2: Craft the Book
Prior to the workshops, participants were asked to come prepared with any craft materials they had access to, including scissors, paper, glue, and tape. To accommodate for the diverse access to resources of my participants, I prepared two versions for creating the diary: a tape method (no-glue) and a glue method. My illustrated instructions for each visualize the folding and cutting process without words. Because the workshops were virtual, live demonstrations were a bit complicated depending on each person's available materials; I asked participants to follow these instructions first and stood by for individual support.
Tape Method
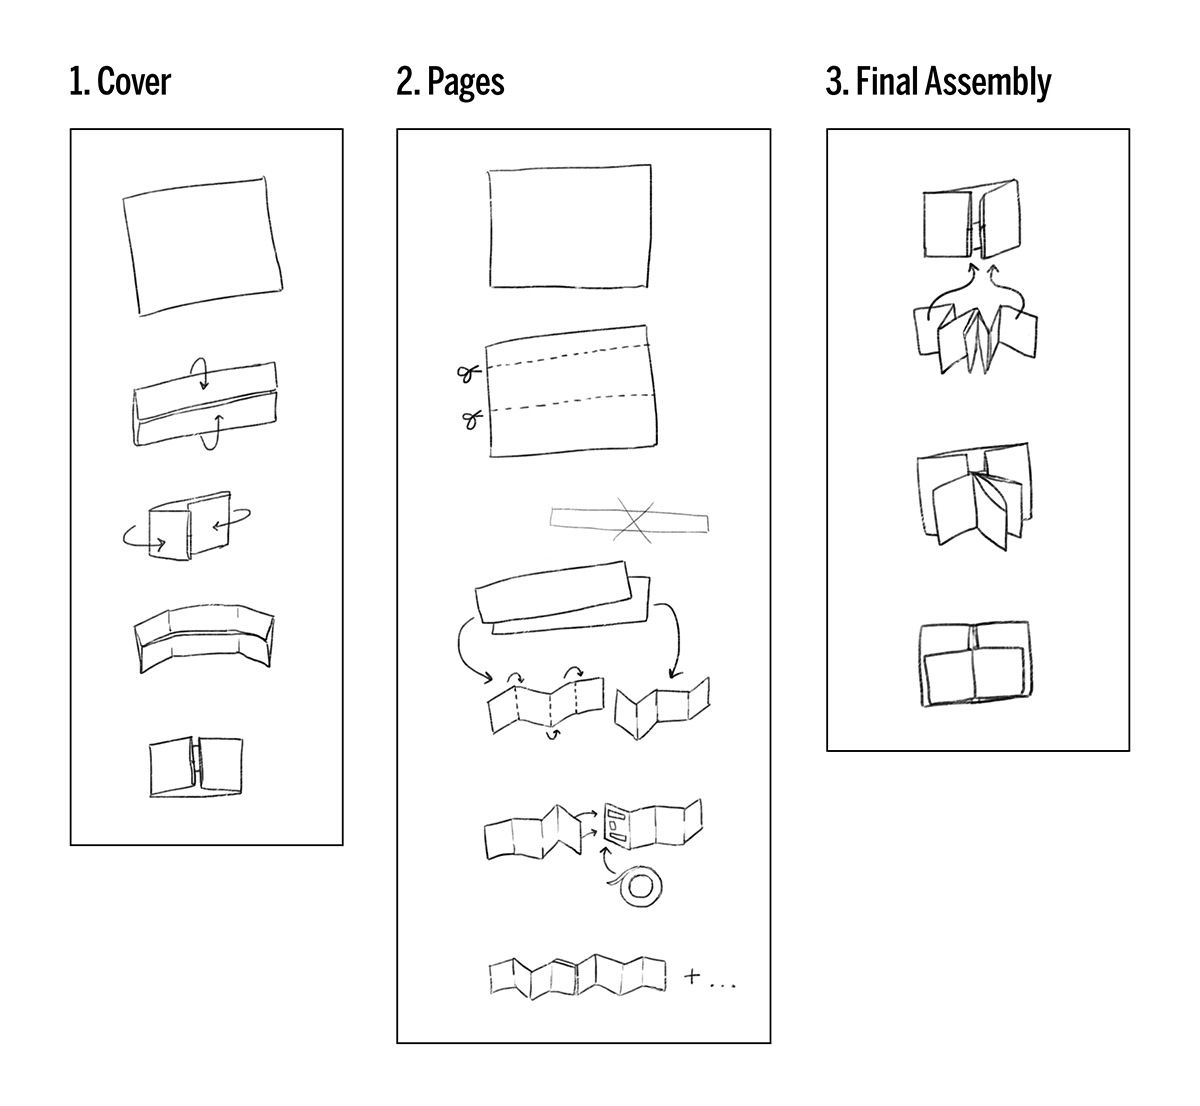 The Tape Method involves cutting and tape and produces a smaller-sized diary.
A Cookie Diary made with the Tape Method will be small, like a mini pocketbook. This method requires less paper but more folding and cutting.
Glue Method
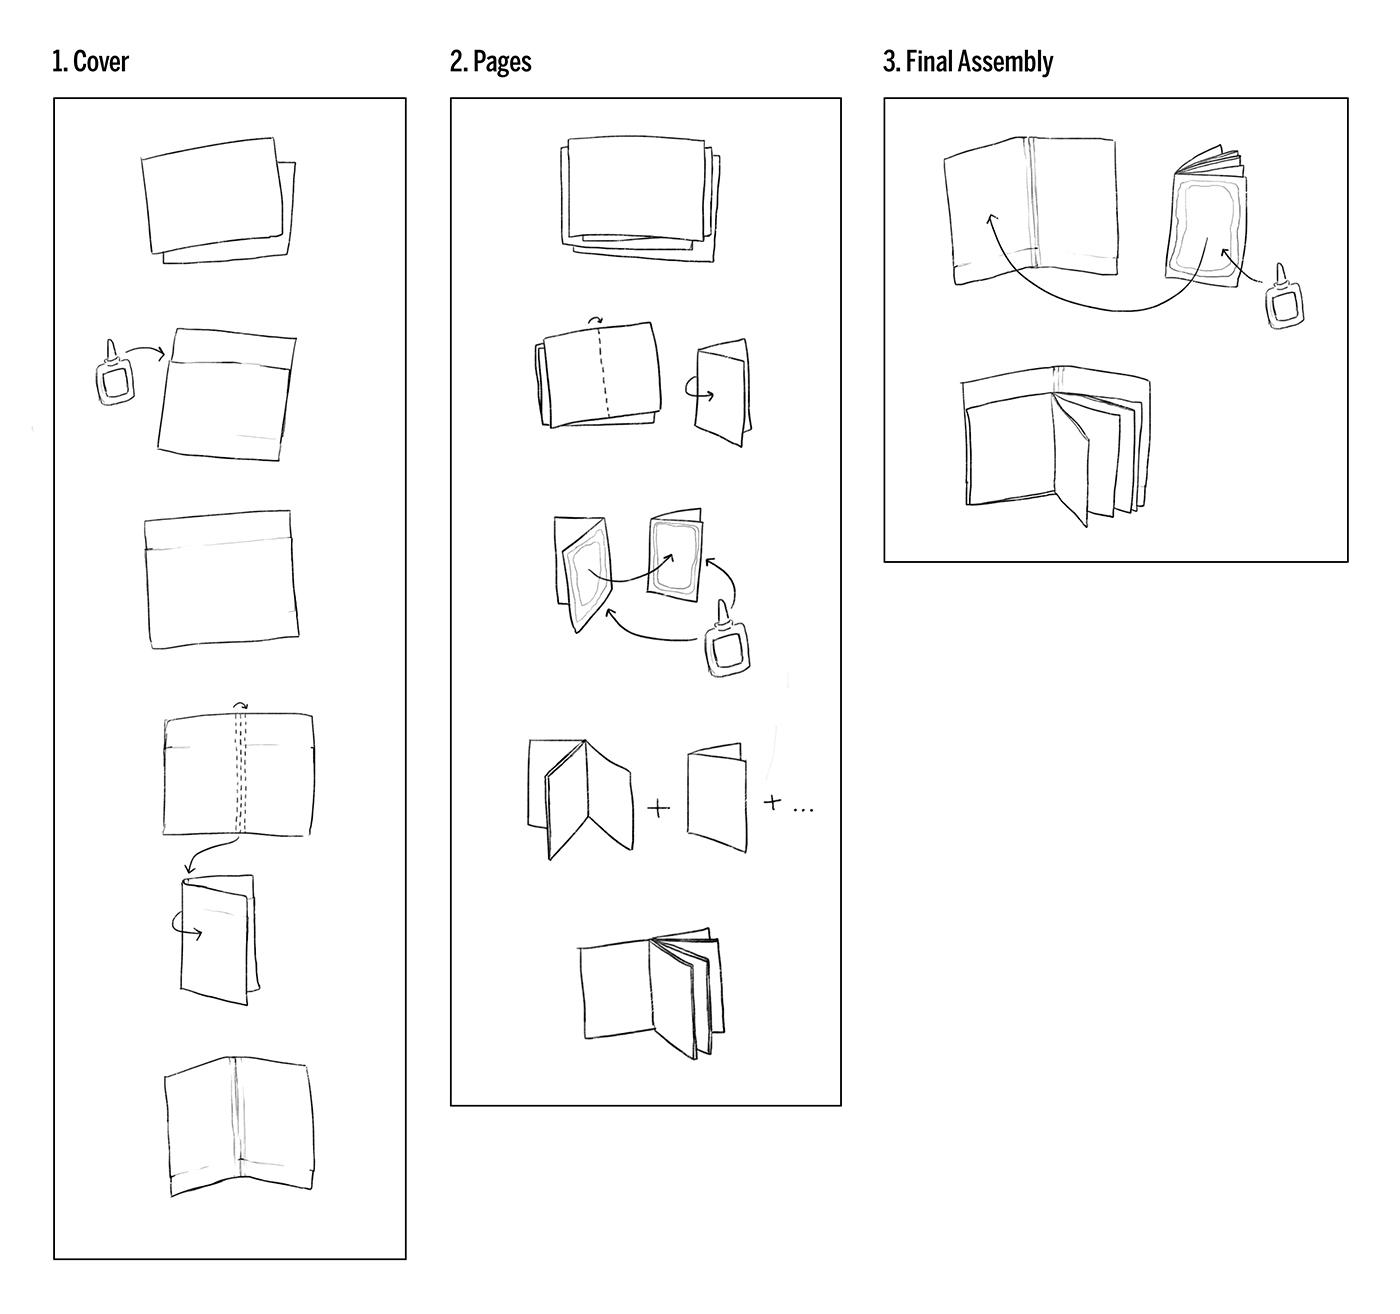 The Glue Method does not involve cutting but requires more paper and some sort of liquid adhesive, producing a larger diary.
A Cookie Diary made with the Glue Method will be about half the size of a normal letter-sized paper. This method requires more paper, but it is also neater in the long run.
Physically, a Cookie Diary should essentially look like a paper journal with a vertical spine in the middle, with the outside cover extending out taller than the inside pages. When you open the book, the outside cover should look like a flap above the top margin of the inner pages, about an inch high.
Step 3: Create the outside cover
Next, participants spend time making the outside cover, both back and front, of their diary however they please. I remind them that the goal is to create a composition that is pleasing, hopeful, and interesting to them.
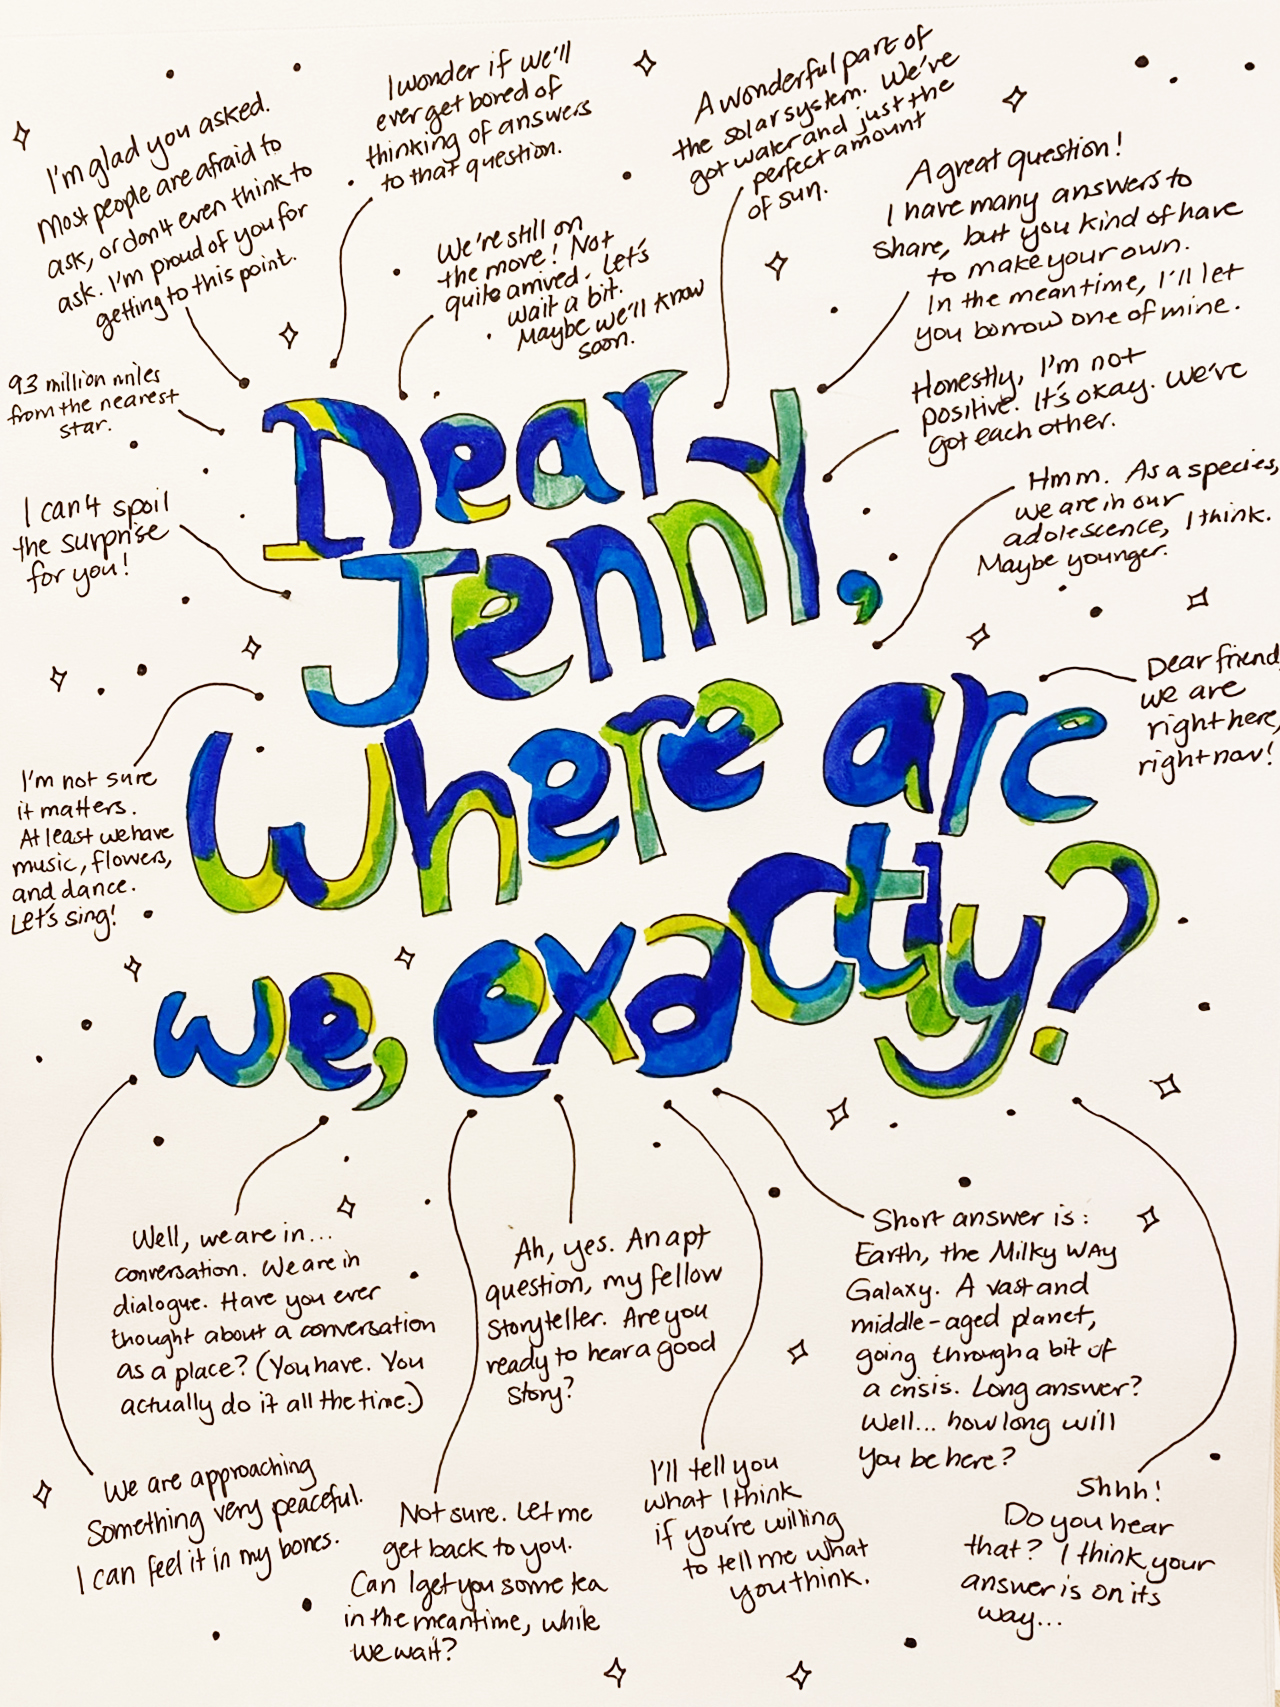 An example cover I created. My goal was to create something that invoked the magic and mystery of life every time I saw my diary!
Design the outside cover of your diary! You can draw and color with any painting or coloring material you have, like markers or penciles. If you are interested in turning your cover into a collage, take your old magazine or wrapping paper and begin cutting out sections that you like specifically. You can choose images, text, shapes, patterns, colors... cut out anything that makes you happy! Using your tape or glue, begin putting your cutouts onto the outside cover. You're making a collage for your front cover and back cover!
Tip: Cut out a big patterned or colored piece to serve as background images for your smaller pieces.
You might plan your collage and take your time flipping through your magazine. You might cut out all the pieces you want first, then put it together at the end. You might also flip through your magazine, cutting out pieces and putting them on your cover as you go, all at once. However you choose to make your collage, remember the way you do it. This is special to you!
Step 4: Mark the inside cover
After some time designing the outside cover, participants inscribe their name on the inside cover of their book using the following Plot Twisters questions:
On the inside cover on the left, write these words:
This Cookie Diary belongs to me, _______________.
What's my journey?
Where is it going?
In the blank space, put your preferred name. You may write and decorate these words any way you want.
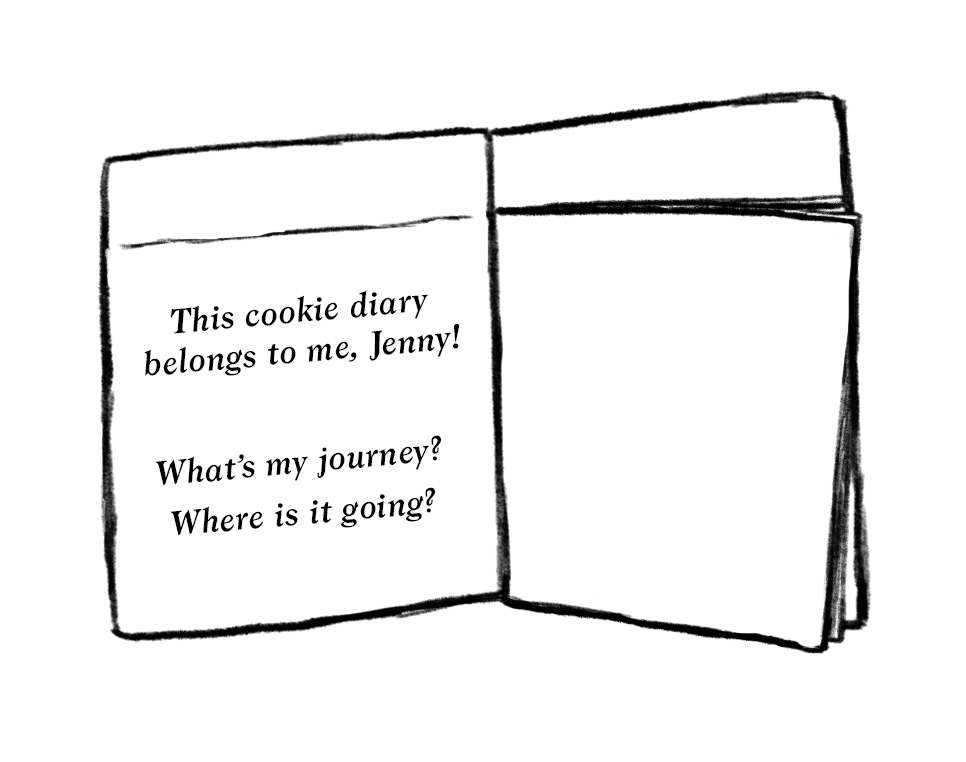 A bare example of the inside cover. Like the rest of the diary, storytellers are invited to customize and add their own twist to the content and appearance.
These questions, "What's my journey? Where is it going?" have served as the tagline of the community and product vision since its formal launch in 2020. As a slogan for curiosity and self-exploration, the questions serve as both a marking of the Plot Twisters ethos as well as a positive and resilient personal reminder.
Step 5: Your cookie trails
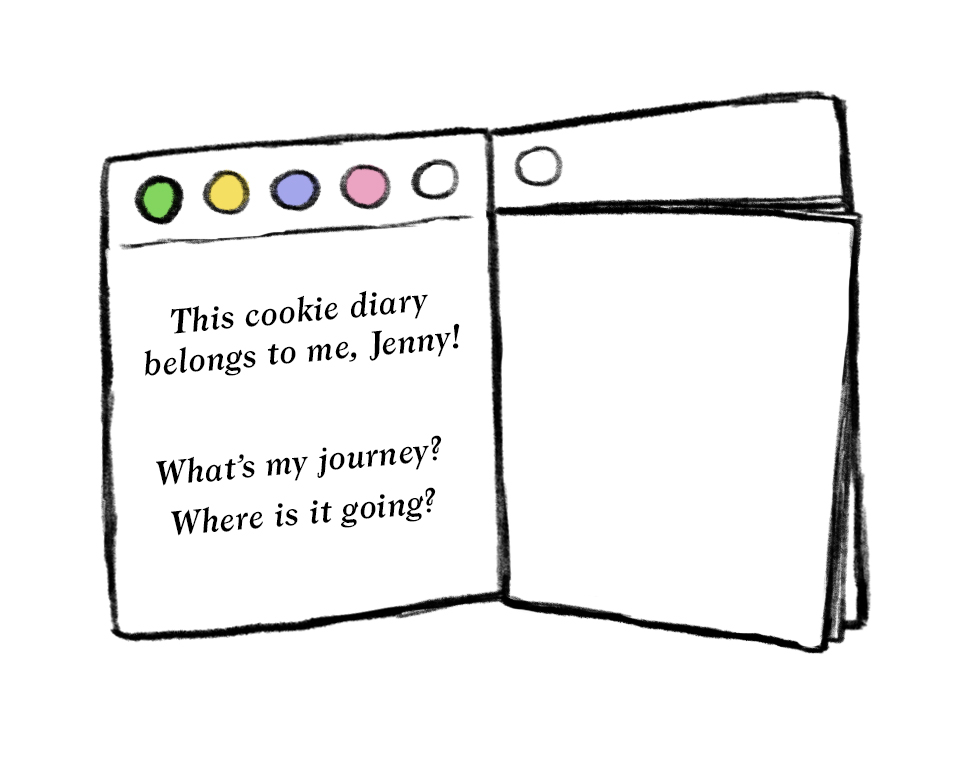
Finally, participants will put the extra height flap of their outside cover to use by turning it into a "Cookie Trail Bar." Essentially, this tab will serve as a visual reminder of a storyteller's values and goals, visible from every page whenever the book is open.
The circles will be colored in and assigned to a particular goal or value, which participants will indicate on the first page of their diary. This first page will be the "Cookie Trail Key," where they can list as many of the consistent life goals they reflected on from Step 1. Each goal will be highlighted or bulleted in chosen color, and that color will correspond to a circle in their Cookie Trail Bar.
Throughout your journaling adventures in your Cookie Diary, the Cookie Trail Bar will help remind you of your consistent life goals. To create your Cookie Trail Bar, draw as many medium-sized circles will fit horizontally along the top flap of your diary. These will be visual symbols of your Cookie Trails.
Next, on the very first page, write down your list of consistent life goals that you reflected on before you started making your diary. This is your Cookie Trail Key, and it will be a list you refer back to often. Write down as many you would like to work toward.
After you write your colors, take your colored pencils, markers, or pastels and highlight or bullet each goal with a different color. Choose colors that you like for each Cookie Trail: this will be the Cookie Trail's assigned color.
Finally, for each color, fill in a circle in your Cookie Trail Bar so every goal in your Cookie Trail Key is represented in your Cookie Trail Bar. Now your diary is ready for journaling!
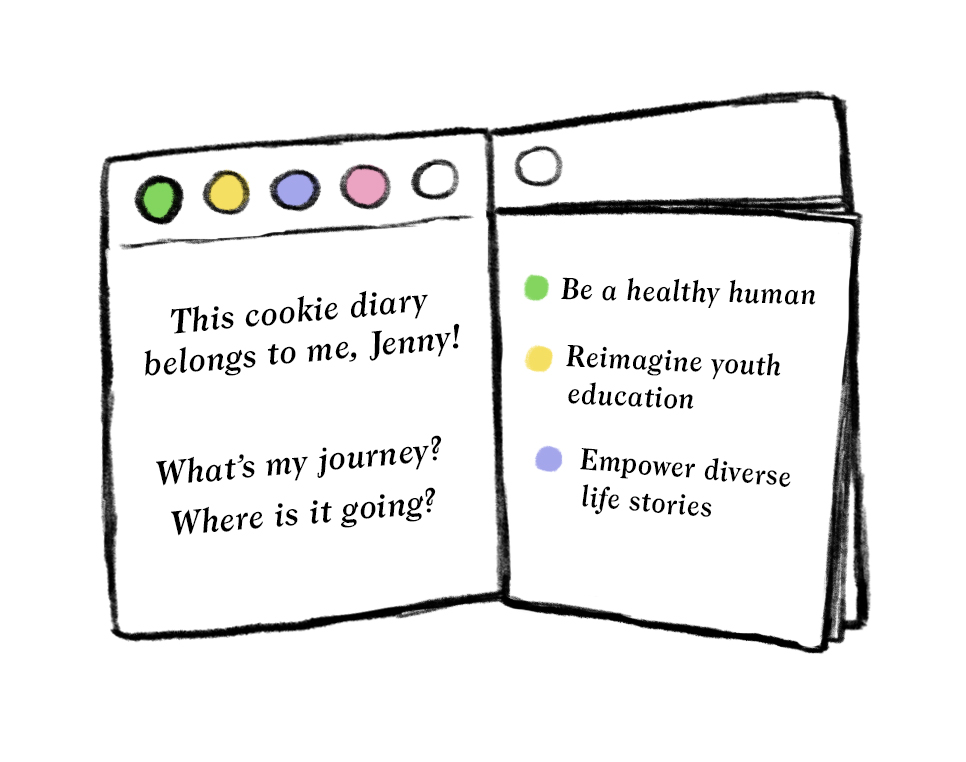 The Cookie Trail Bar (top strip of journal) and Cookie Trail Key (first page on right) are what make the Cookie Diary a Cookie Diary.
Step 5: Start Baking!
After completing the assembly of the diary, participants are invited to appreciate their creation, think about journaling techniques, and set an intention for the use of their diary.
Your Homemade Cookie Diary is officially complete! This diary will be a keepsake that documents your past, present, and future. You can use it to reflect on past recipes that went well or not so well, as well as future treats that you are looking forward to baking. Of course, you can use it to also store present experiences and milestones of all shapes, sizes, and levels of sweetness on a daily basis.
The possibilities for self-reflection are endless. As a practice, I encourage you to look at your Cookie Trail Key often, and add new Cookie Trails and make changes when it feels right. I also recommend marking up the pages of your entries with the same colors of your Cookie Trails to show when an entry is connected to a goal of yours. This will help you keep track of your goals and reveal progress whenever you flip through your diary.
Let's take a moment to visualize yourself using this journal to note the milestones of your days. Where do you see yourself writing in this? Do you have a time of day you would like to make time to reflect?
Finally, I have two last questions for you: What's your journey? Where is it going?
Takeaways
The Homemade Cookie Diary creation process and pilot tests informed many future explorations in Plot Twisters, especially physical applications of our conceptual metaphors and personal storytelling activities. As a physical prototype, it formalized our approach to values-focused self-reflection, and also provided a foundation for visualizing concepts as potentially nebulous as life goals in a tangible and accessible format. We are excited to use the same playful illustrative and instructive style to facilitate workshops and gametests for our Storytelling Cards. Finally, this prototype set a tone for the branding and ethos of Plot Twisters: a playful, approachable, and earnestly hopeful movement invested in deeper ways of getting to know ourselves.